Kết nối với các máy chủ DNS công khai AdGuard
Nhanh chóng chặn quảng cáo, trình theo dõi, phần mềm độc hại, và các trang web người lớn với sự trợ giúp của các máy chủ DNS công khai miễn phí AdGuard
Tùy chọn 1: Cài đặt AdGuard Khuyến nghị
Đây là cách nhanh nhất và dễ nhất. Chỉ cần cài đặt AdGuard Ad Blocker trên thiết bị của bạn, vào cài đặt máy chủ của ứng dụng và chọn AdGuard DNS. Không cần nhập địa chỉ máy chủ DNS theo cách thủ công!
Ngoài DNS, bạn sẽ nhận được chặn quảng cáo chính xác và bảo vệ theo dõi tiên tiến
Bảo vệ thiết bị Windows của bạn ở cấp hệ thống
Bảo vệ thiết bị Mac của bạn mà không cần cài đặt phần mềm bổ sung
Chặn quảng cáo, trình theo dõi và các mối đe dọa mọi lúc trên thiết bị Android của bạn
Tận hưởng trải nghiệm không có quảng cáo trên thiết bị iOS của bạn — trong các trình duyệt và ứng dụng
Tải xuống
Tùy chọn 2: Cấu hình AdGuard DNS một cách thủ công
Nếu bạn muốn cấu hình máy chủ DNS công khai AdGuard một cách thủ công, chúng tôi đã chuẩn bị sẵn cho bạn mọi thứ. Chọn nền tảng thiết bị của bạn và nhận hướng dẫn thiết lập
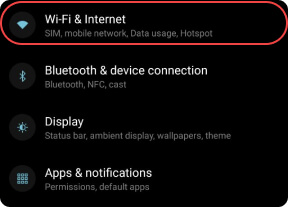
Đi tới Cài đặt → Mạng & Internet (hoặc Wi-Fi & Internet)
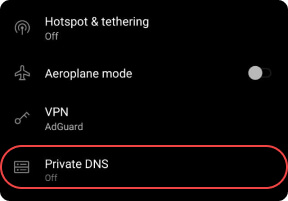
Chọn Nâng cao → DNS riêng.
Chọn tên nhà cung cấp DNS riêng. Nhập một trong các máy chủ dưới đây:
Máy chủ mặc định
dns.adguard-dns.com
AdGuard DNS sẽ chặn quảng cáo và trình theo dõi.
Máy chủ không lọc
unfiltered.adguard-dns.com
AdGuard DNS sẽ không chặn quảng cáo, trình theo dõi hoặc bất kỳ yêu cầu DNS nào khác.
Máy chủ bảo vệ gia đình
family.adguard-dns.com
AdGuard DNS sẽ chặn quảng cáo, trình theo dõi, nội dung người lớn, và kích hoạt Tìm kiếm an toàn và Chế độ an toàn, khi có thể.
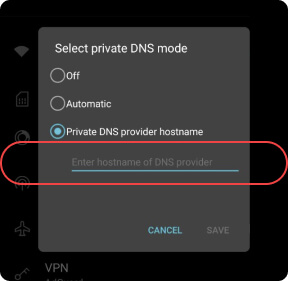
Nhấn Lưu.
Để nhận hồ sơ cấu hình chung, hãy chọn máy chủ DNS bên dưới và nhấn Tải xuống hồ sơ cấu hình. Đối với hồ sơ cấu hình tùy chỉnh, hãy nhấn vào Mở trình tạo hồ sơ.
Trình tạo hồ sơ
Tạo cấu hình cho iOS / macOS sẽ sử dụng AdGuard DNS nguyên bản.
1. Chọn máy chủ DNS và loại mã hóa.
2. Vô hiệu hóa AdGuard DNS cho các mạng Wi-Fi bên dưới.
3. Vô hiệu hóa DNS AdGuard cho các tên miền (và tên miền phụ của chúng) bên dưới.
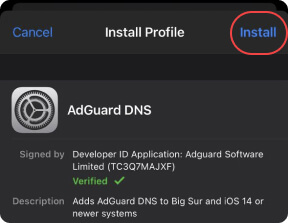
Mở ứng dụng Cài đặt trên thiết bị của bạn.
Nhấn vào Hồ sơ đã tải xuống.
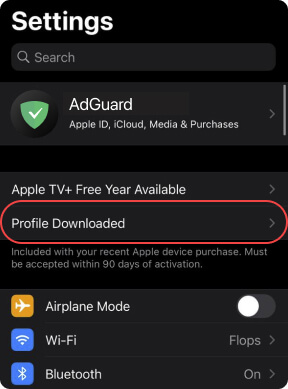
Nhấn vào Cài đặt và làm theo hướng dẫn trên màn hình.
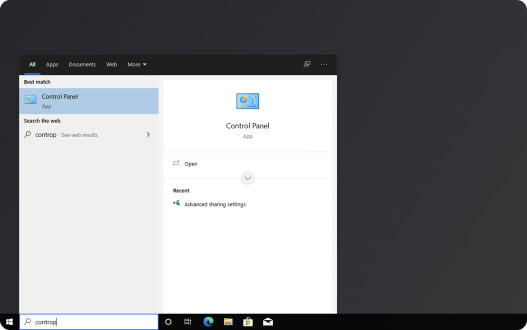
Đi tới menu Bắt đầu → Bảng điều khiển.
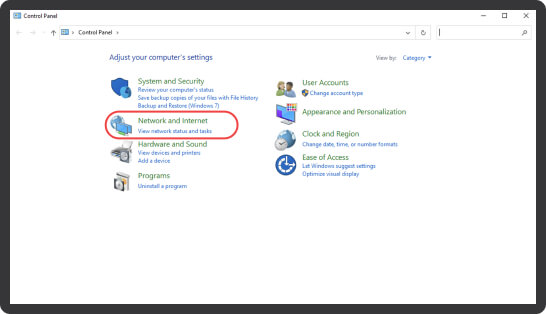
Chọn Mạng và Internet.
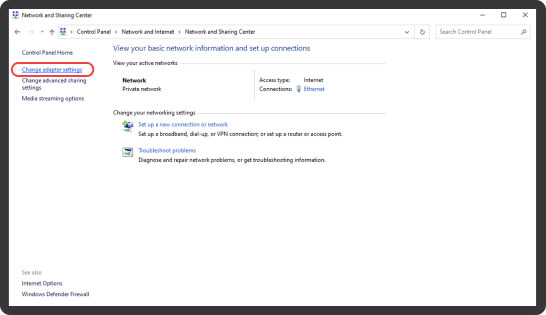
Nhấp vào Trung tâm Mạng và Chia sẻ.

Trong bảng điều khiển bên trái, chọn Thay đổi cài đặt bộ điều hợp.
Nhấp vào mạng Wi-Fi mà bạn đang kết nối.
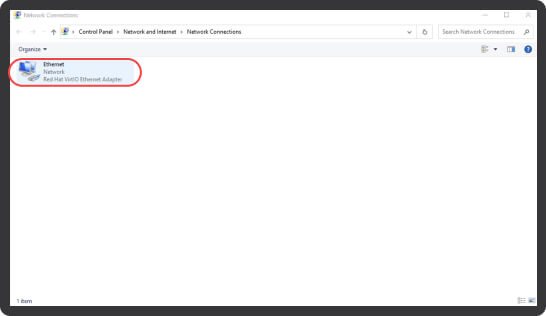
Trong thanh tùy chọn, chọn Thay đổi cài đặt của kết nối này. Nếu tùy chọn bị ẩn, hãy nhấp vào biểu tượng chữ vit.
Ngoài ra, nhấp chuột phải vào biểu tượng kết nối và chọn Thuộc tính.

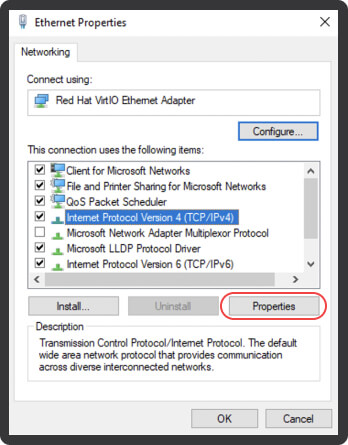
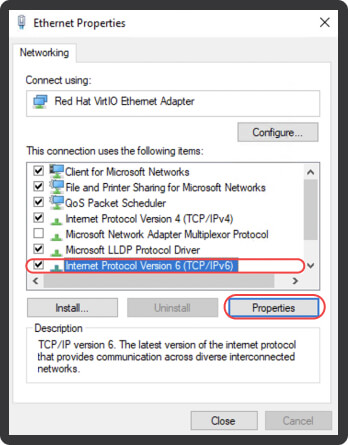
Chọn Giao thức Internet Phiên bản 4 (TCP/IPv4).
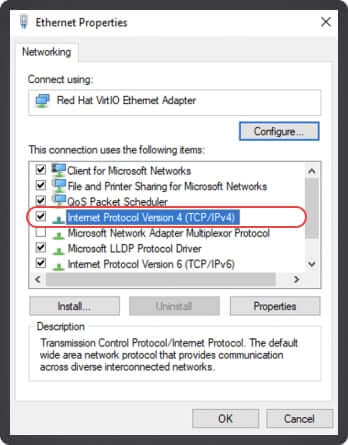
Nhấp vào Bất động sản.
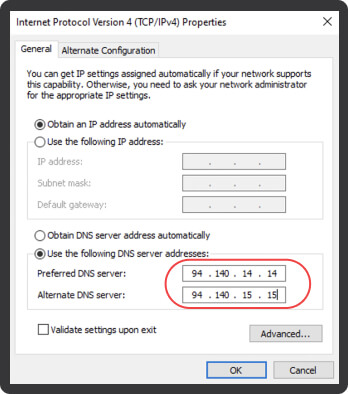
Chọn Sử dụng các địa chỉ máy chủ DNS sau.
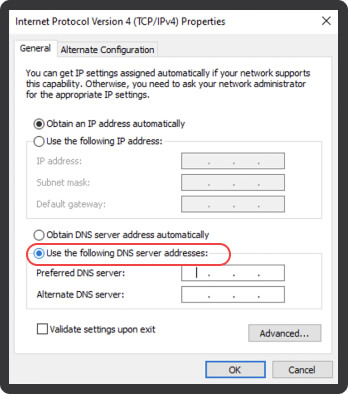
Nhập địa chỉ của một trong các máy chủ dưới đây là Máy chủ DNS ưa thích và Máy chủ DNS thay thế.
Máy chủ mặc định
AdGuard DNS sẽ chặn quảng cáo và trình theo dõi.
94.140.14.14
94.140.15.15
Máy chủ không lọc
AdGuard DNS sẽ không chặn quảng cáo, trình theo dõi hoặc bất kỳ yêu cầu DNS nào khác.
94.140.14.140
94.140.14.141
Máy chủ bảo vệ gia đình
AdGuard DNS sẽ chặn quảng cáo, trình theo dõi, nội dung người lớn và bật Tìm kiếm an toàn và Chế độ an toàn, nếu có thể.
94.140.14.15
94.140.15.16
Nhấn OK.
Chọn Giao thức Internet Phiên bản 6 (TCP / IPv6) và nhấp vào Thuộc tính.
Chọn Sử dụng các địa chỉ máy chủ DNS sau.
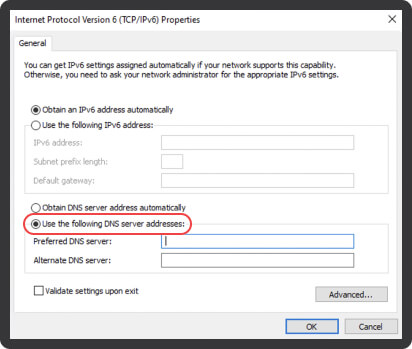
Nhập địa chỉ của một trong các máy chủ dưới đây là Máy chủ DNS ưa thích và Máy chủ DNS thay thế.
Máy chủ mặc định
AdGuard DNS sẽ chặn quảng cáo và trình theo dõi.
2a10:50c0::ad1:ff
2a10:50c0::ad2:ff
Máy chủ không lọc
AdGuard DNS sẽ không chặn quảng cáo, trình theo dõi hoặc bất kỳ yêu cầu DNS nào khác.
2a10:50c0::1:ff
2a10:50c0::2:ff
Máy chủ bảo vệ gia đình
AdGuard DNS sẽ chặn quảng cáo, trình theo dõi, nội dung người lớn và bật Tìm kiếm an toàn và Chế độ an toàn, nếu có thể.
2a10:50c0::bad1:ff
2a10:50c0::bad2:ff
Nhấn OK.
Nhấp vào Đóng.
For macOS Sequoia 15.5 or newer
Chọn máy chủ DNS theo sở thích của bạn và nhấn nút để tải xuống cấu hình.
Trình tạo hồ sơ
Tạo cấu hình cho iOS / macOS sẽ sử dụng AdGuard DNS nguyên bản.
1. Chọn máy chủ DNS và loại mã hóa.
2. Vô hiệu hóa AdGuard DNS cho các mạng Wi-Fi bên dưới.
3. Vô hiệu hóa DNS AdGuard cho các tên miền (và tên miền phụ của chúng) bên dưới.
Choose Apple menu → System Settings.
Click Profile Downloaded in the sidebar and double-click the profile to install it.
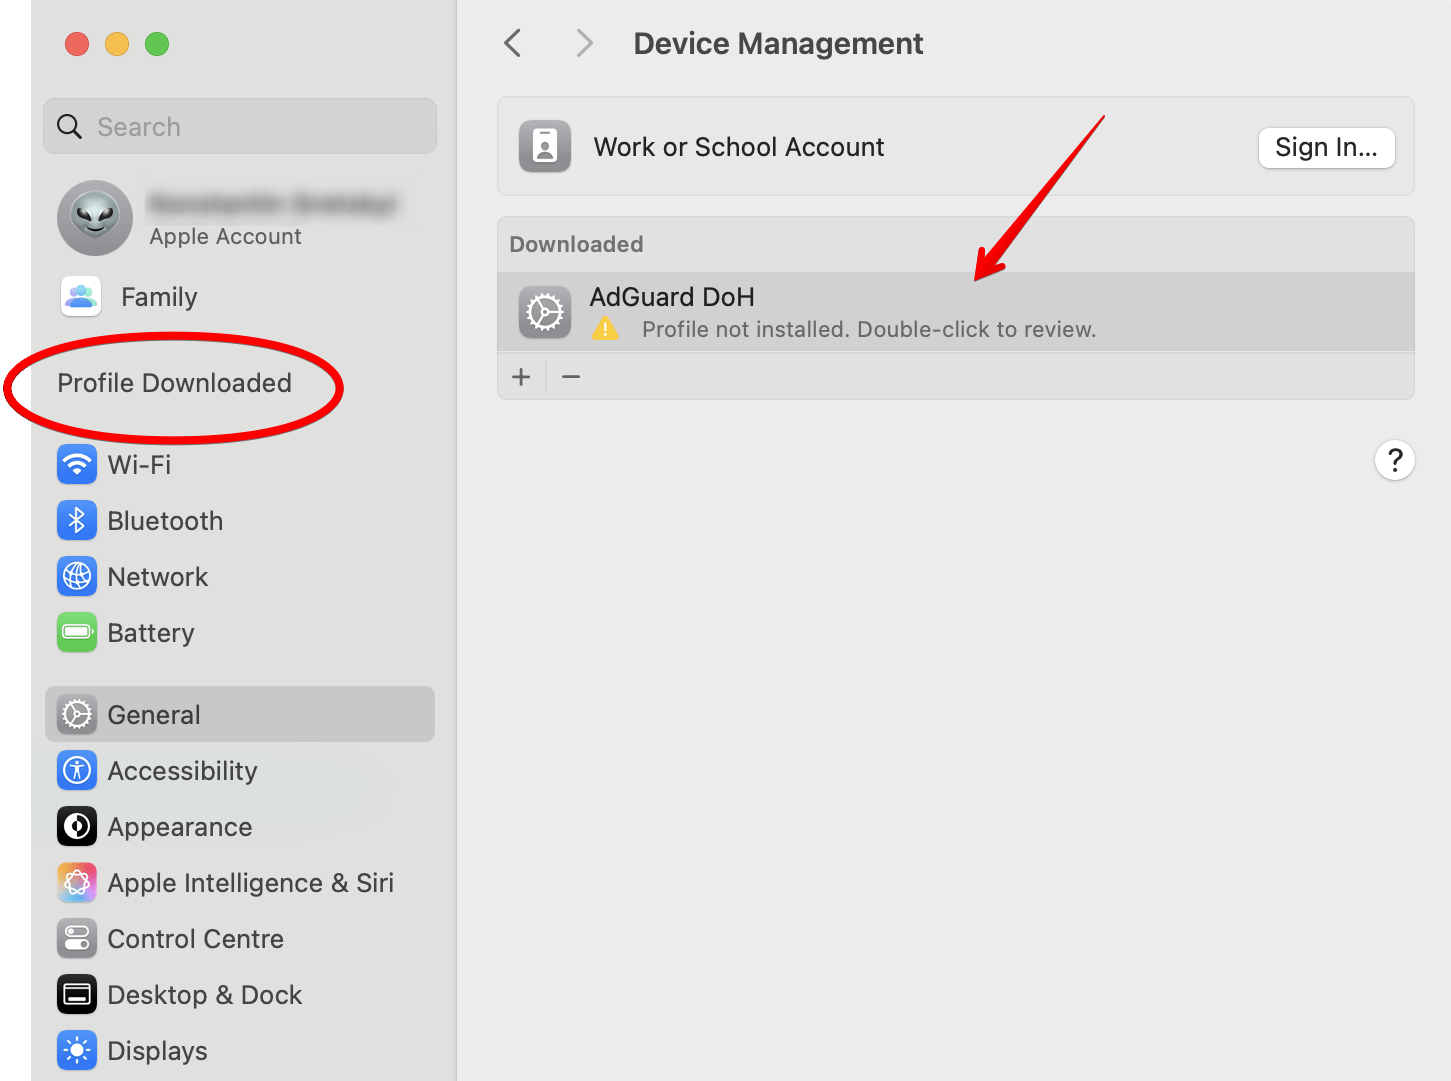
Enter the admin password and click OK.
Tất cả đã được làm xong! Thiết bị của bạn được kết nối thành công với AdGuard DNS.
For macOS Ventura and macOS Sequoia 15.4
Chọn máy chủ DNS theo sở thích của bạn và nhấn nút để tải xuống cấu hình.
Trình tạo hồ sơ
Tạo cấu hình cho iOS / macOS sẽ sử dụng AdGuard DNS nguyên bản.
1. Chọn máy chủ DNS và loại mã hóa.
2. Vô hiệu hóa AdGuard DNS cho các mạng Wi-Fi bên dưới.
3. Vô hiệu hóa DNS AdGuard cho các tên miền (và tên miền phụ của chúng) bên dưới.
Choose Apple menu → System Settings, click Privacy and Security in the sidebar, then click Profiles on the right (you may need to scroll down).
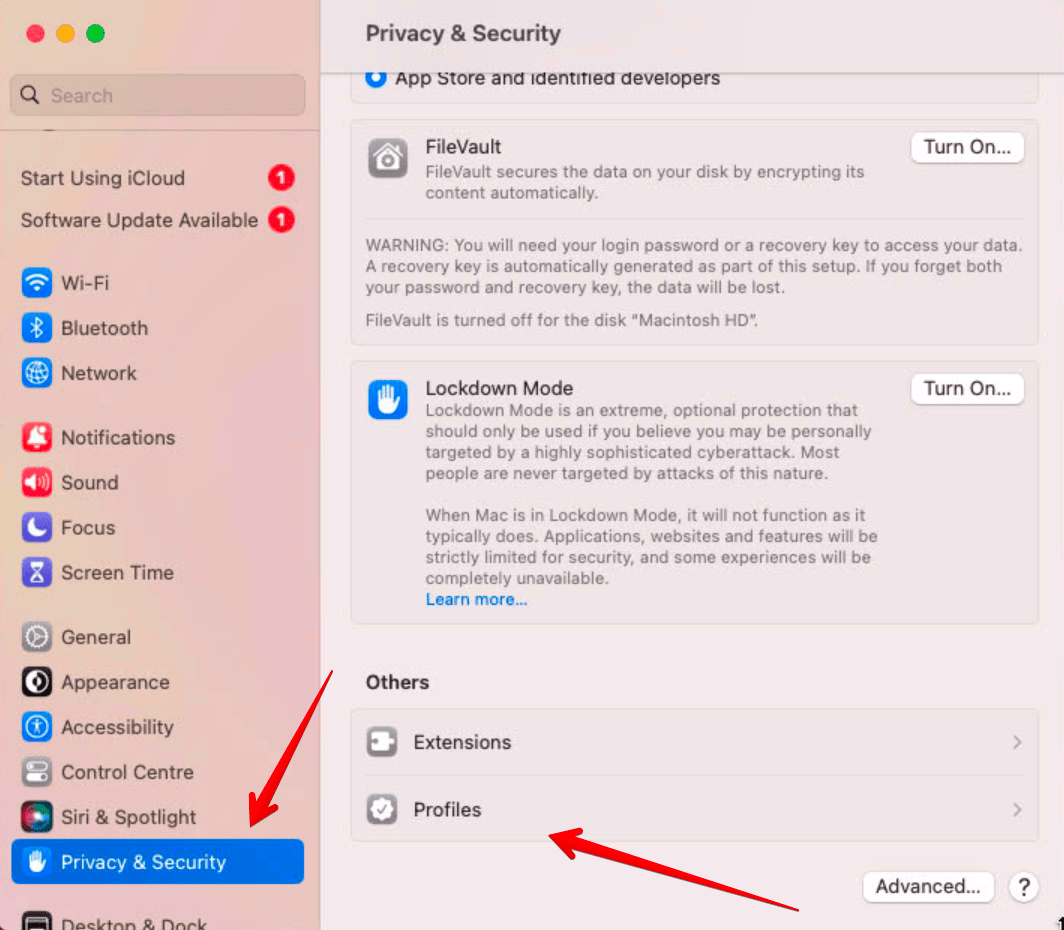
In the Downloaded section, double-click the profile to install it.

Enter the admin password and click OK.
Tất cả đã được làm xong! Thiết bị của bạn được kết nối thành công với AdGuard DNS.
For macOS Big Sur and macOS Monterey
Chọn máy chủ DNS theo sở thích của bạn và nhấn nút để tải xuống cấu hình.
Trình tạo hồ sơ
Tạo cấu hình cho iOS / macOS sẽ sử dụng AdGuard DNS nguyên bản.
1. Chọn máy chủ DNS và loại mã hóa.
2. Vô hiệu hóa AdGuard DNS cho các mạng Wi-Fi bên dưới.
3. Vô hiệu hóa DNS AdGuard cho các tên miền (và tên miền phụ của chúng) bên dưới.
Mở ứng dụng Cài đặt trên thiết bị của bạn.
Chọn Hồ sơ.
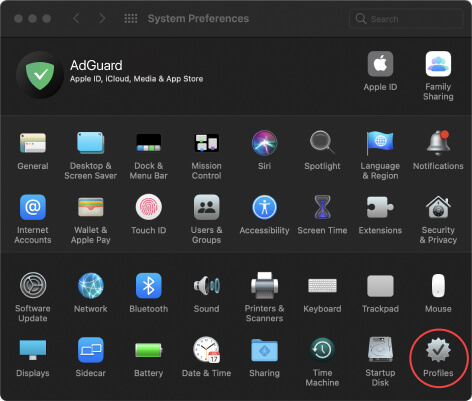
Chọn cấu hình DNS AdGuard đã tải xuống và nhấp vào Cài đặt.
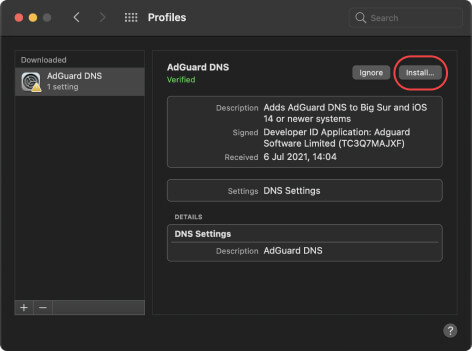
Tất cả đã được làm xong! Thiết bị của bạn được kết nối thành công với AdGuard DNS.
AdGuard Home
Hãy thử AdGuard Home, một công cụ mạnh mẽ để chặn quảng cáo và trình theo dõi và quản lý mạng gia đình của bạn. Sau khi cài đặt và cấu hình, AdGuard Home sẽ bảo vệ TẤT CẢ các thiết bị được kết nối với Wi-Fi gia đình của bạn mà không cần bất kỳ phần mềm máy khách nào.
Để biết thêm thông tin, hãy truy cập kho lưu trữ GitHub.
Ubuntu
Mở Cài đặt hệ thống hoặc hệ thống, tùy thuộc vào phiên bản của bạn.
Chọn Wi-Fi cho kết nối không dây hoặc Mạng cho kết nối cáp và nhấp vào bánh răng bên cạnh kết nối cần thiết.
Chọn IPv4.
Nhập địa chỉ của một trong các máy chủ DNS bên dưới.
Máy chủ mặc định
AdGuard DNS sẽ chặn quảng cáo và trình theo dõi.
94.140.14.14
94.140.15.15
Máy chủ không lọc
AdGuard DNS sẽ không chặn quảng cáo, trình theo dõi hoặc bất kỳ yêu cầu DNS nào khác.
94.140.14.140
94.140.14.141
Máy chủ bảo vệ gia đình
AdGuard DNS sẽ chặn quảng cáo, trình theo dõi, nội dung người lớn và bật Tìm kiếm an toàn và Chế độ an toàn, nếu có thể.
94.140.14.15
94.140.15.16
Tắt công tắc Tự động bên cạnh trường DNS.
Nhấp vào Áp dụng.
Chọn IPv6.
Nhập địa chỉ của một trong các máy chủ DNS bên dưới.
Máy chủ mặc định
AdGuard DNS sẽ chặn quảng cáo và trình theo dõi.
2a10:50c0::ad1:ff
2a10:50c0::ad2:ff
Máy chủ không lọc
AdGuard DNS sẽ không chặn quảng cáo, trình theo dõi hoặc bất kỳ yêu cầu DNS nào khác.
2a10:50c0::1:ff
2a10:50c0::2:ff
Máy chủ bảo vệ gia đình
AdGuard DNS sẽ chặn quảng cáo, trình theo dõi, nội dung người lớn và bật Tìm kiếm an toàn và Chế độ an toàn, nếu có thể.
2a10:50c0::bad1:ff
2a10:50c0::bad2:ff
Tắt công tắc Tự động bên cạnh trường DNS.
Nhấp vào Áp dụng.
Khởi động lại mạng của bạn để áp dụng các thay đổi.
Debian
Mở thiết bị đầu cuối.
Trong dòng lệnh, gõ:
"Tô"
Nhập mật khẩu gốc.
Trong dòng lệnh, nhập:
'nano /etc/resolv.conf'
Khi trình soạn thảo văn bản mở ra, hãy nhập địa chỉ của một trong các máy chủ bên dưới.
Máy chủ mặc định
AdGuard DNS sẽ chặn quảng cáo và trình theo dõi.
IPv4:
94.140.14.14
94.140.15.15
IPv6:
2a10:50c0::ad1:ff
2a10:50c0::ad2:ff
Máy chủ không lọc
AdGuard DNS sẽ không chặn quảng cáo, trình theo dõi hoặc bất kỳ yêu cầu DNS nào khác.
IPv4:
94.140.14.140
94.140.14.141
IPv6:
2a10:50c0::1:ff
2a10:50c0::2:ff
Máy chủ bảo vệ gia đình
AdGuard DNS sẽ chặn quảng cáo, trình theo dõi, nội dung người lớn và bật Tìm kiếm an toàn và Chế độ an toàn, nếu có thể.
IPv4:
94.140.14.15
94.140.15.16
IPv6:
2a10:50c0::bad1:ff
2a10:50c0::bad2:ff
Nhấn Ctrl + O để lưu tệp.
Nhấn Enter.
Nhấn Ctrl + X để thoát khỏi trình soạn thảo.
Trong dòng lệnh, nhập:
'/etc/init.d/networking restart'
Nhấn Enter.
Đóng thiết bị đầu cuối.
Mở tùy chọn bộ định tuyến của bạn. Thông thường, bạn có thể truy cập chúng thông qua trình duyệt của mình. Xem các mô hình bộ định tuyến bên dưới để biết các địa chỉ có thể.
Bộ định tuyến Linksys và Asus: http://192.168.1.1
Bộ định tuyến D-Link: http://192.168.0.1
Bộ định tuyến Ubiquiti: http://unifi.ubnt.com
Nhập mật khẩu bộ định tuyến.
Lưu ý: đảm bảo bạn ghi lại mật khẩu bộ định tuyến ở nơi an toàn. Một số kiểu bộ định tuyến có các ứng dụng quản lý mật khẩu cụ thể: nếu đó là trường hợp của bạn, ứng dụng sẽ được cài đặt sẵn trên máy tính của bạn.
Đi tới cài đặt DNS trong trang quản trị bộ định tuyến. Thay thế địa chỉ DNS bằng địa chỉ của một trong các máy chủ bên dưới.
Máy chủ mặc định
AdGuard DNS sẽ chặn quảng cáo và trình theo dõi.
IPv4:
94.140.14.14
94.140.15.15
IPv6:
2a10:50c0::ad1:ff
2a10:50c0::ad2:ff
Máy chủ không lọc
AdGuard DNS sẽ không chặn quảng cáo, trình theo dõi hoặc bất kỳ yêu cầu DNS nào khác.
IPv4:
94.140.14.140
94.140.14.141
IPv6:
2a10:50c0::1:ff
2a10:50c0::2:ff
Máy chủ bảo vệ gia đình
AdGuard DNS sẽ chặn quảng cáo, trình theo dõi, nội dung người lớn và bật Tìm kiếm an toàn và Chế độ an toàn, nếu có thể.
IPv4:
94.140.14.15
94.140.15.16
IPv6:
2a10:50c0::bad1:ff
2a10:50c0::bad2:ff
Lưu thay đổi.
PS4
Đi tới Cài đặt → Mạng.
Chọn Thiết lập kết nối Internet.
Chọn Sử dụng Wi-Fi hoặc Sử dụng cáp LAN tùy thuộc vào kết nối mạng của bạn.
Chọn Tùy chỉnh.
Đặt cài đặt địa chỉ IP thành Tự động.
Đặt tên máy chủ DHCP thành Không chỉ định.
Đặt cài đặt DNS thành Thủ công.
Thay đổi địa chỉ DNS thành địa chỉ của một trong các máy chủ bên dưới.
Máy chủ mặc định
AdGuard DNS sẽ chặn quảng cáo và trình theo dõi.
94.140.14.14
94.140.15.15
Máy chủ không lọc
AdGuard DNS sẽ không chặn quảng cáo, trình theo dõi hoặc bất kỳ yêu cầu DNS nào khác.
94.140.14.140
94.140.14.141
Máy chủ bảo vệ gia đình
AdGuard DNS sẽ chặn quảng cáo, trình theo dõi, nội dung người lớn và bật Tìm kiếm an toàn và Chế độ an toàn, nếu có thể.
94.140.14.15
94.140.15.16
Nếu bảng điều khiển trò chơi của bạn hỗ trợ địa chỉ IPv6, hãy thêm chúng.
Máy chủ mặc định
AdGuard DNS sẽ chặn quảng cáo và trình theo dõi.
2a10:50c0::ad1:ff
2a10:50c0::ad2:ff
Máy chủ không lọc
AdGuard DNS sẽ không chặn quảng cáo, trình theo dõi hoặc bất kỳ yêu cầu DNS nào khác.
2a10:50c0::1:ff
2a10:50c0::2:ff
Máy chủ bảo vệ gia đình
AdGuard DNS sẽ chặn quảng cáo, trình theo dõi, nội dung người lớn và bật Tìm kiếm an toàn và Chế độ an toàn, nếu có thể.
2a10:50c0::bad1:ff
2a10:50c0::bad2:ff
Đặt cài đặt MTU thành Tự động.
Đặt máy chủ proxy thành không sử dụng.
PS5
Bật bảng điều khiển PS5 của bạn và đăng nhập vào tài khoản của bạn.
Từ màn hình chính PS5, chọn biểu tượng Cài đặt (biểu tượng bánh răng) nằm ở góc trên cùng bên phải của màn hình.
Trong menu Cài đặt, chọn Mạng.
Trong Mạng, chọn Cài đặt.
Chọn mạng của bạn và chọn Thiết lập kết nối Internet.
Chọn Tùy chỉnh và sau đó chọn Cài đặt DNS.
Chọn Thủ công và sau đó nhập địa chỉ máy chủ DNS chính:
Máy chủ mặc định
AdGuard DNS sẽ chặn quảng cáo và trình theo dõi.
94.140.14.14
94.140.15.15
Máy chủ không lọc
AdGuard DNS sẽ không chặn quảng cáo, trình theo dõi hoặc bất kỳ yêu cầu DNS nào khác.
94.140.14.140
94.140.14.141
Máy chủ bảo vệ gia đình
AdGuard DNS sẽ chặn quảng cáo, trình theo dõi và nội dung người lớn và bật Tìm kiếm an toàn và Chế độ an toàn, nếu có thể.
94.140.14.15
94.140.15.16
(Tùy chọn) Nhập địa chỉ máy chủ DNS phụ. Đây là máy chủ DNS dự phòng mà PS5 của bạn sẽ sử dụng nếu máy chủ DNS chính không khả dụng:
Máy chủ mặc định
AdGuard DNS sẽ chặn quảng cáo và trình theo dõi.
94.140.14.14
94.140.15.15
Máy chủ không lọc
AdGuard DNS sẽ không chặn quảng cáo, trình theo dõi hoặc bất kỳ yêu cầu DNS nào khác.
94.140.14.140
94.140.14.141
Máy chủ bảo vệ gia đình
AdGuard DNS sẽ chặn quảng cáo, trình theo dõi và nội dung người lớn và bật Tìm kiếm an toàn và Chế độ an toàn, nếu có thể.
94.140.14.15
94.140.15.16
Nếu bảng điều khiển của bạn hỗ trợ IPv6, hãy thêm chúng.
Máy chủ mặc định
AdGuard DNS sẽ chặn quảng cáo và trình theo dõi.
2a10:50c0::ad1:ff
2a10:50c0::ad2:ff
Máy chủ không lọc
AdGuard DNS sẽ không chặn quảng cáo, trình theo dõi hoặc bất kỳ yêu cầu DNS nào khác.
2a10:50c0::1:ff
2a10:50c0::2:ff
Máy chủ bảo vệ gia đình
AdGuard DNS sẽ chặn quảng cáo, trình theo dõi và nội dung người lớn và bật Tìm kiếm an toàn và Chế độ an toàn, nếu có thể.
2a10:50c0::bad1:ff
2a10:50c0::bad2:ff
Chọn Tiếp theo để tiếp tục.
Trên màn hình tiếp theo, chọn Tự động cho cài đặt MTU.
Trên màn hình Máy chủ proxy, chọn Không sử dụng.
Chọn Kiểm tra kết nối Internet để kiểm tra cài đặt DNS mới của bạn.
Sau khi kiểm tra xong và bạn thấy Kết nối Internet: Thành công, hãy chọn Xác nhận để lưu cài đặt của bạn.
Khởi động lại bảng điều khiển PS5 của bạn để áp dụng các thay đổi.
Xbox
Nhấn nút Xbox trên bộ điều khiển của bạn để mở hướng dẫn.
Chọn Cấu hình &→ hệ thống Cài đặt → Cài đặt mạng → chung.
Từ các tùy chọn màn hình Mạng, đi tới Cài đặt nâng cao → Cài đặt DNS.
Chọn Thủ công.
Thay đổi địa chỉ DNS thành địa chỉ của một trong các máy chủ bên dưới.
Máy chủ mặc định
AdGuard DNS sẽ chặn quảng cáo và trình theo dõi.
94.140.14.14
94.140.15.15
Máy chủ không lọc
AdGuard DNS sẽ không chặn quảng cáo, trình theo dõi hoặc bất kỳ yêu cầu DNS nào khác.
94.140.14.140
94.140.14.141
Máy chủ bảo vệ gia đình
AdGuard DNS sẽ chặn quảng cáo, trình theo dõi, nội dung người lớn và bật Tìm kiếm an toàn và Chế độ an toàn, nếu có thể.
94.140.14.15
94.140.15.16
Nếu bảng điều khiển trò chơi của bạn hỗ trợ địa chỉ IPv6, hãy thêm chúng.
Máy chủ mặc định
AdGuard DNS sẽ chặn quảng cáo và trình theo dõi.
2a10:50c0::ad1:ff
2a10:50c0::ad2:ff
Máy chủ không lọc
AdGuard DNS sẽ không chặn quảng cáo, trình theo dõi hoặc bất kỳ yêu cầu DNS nào khác.
2a10:50c0::1:ff
2a10:50c0::2:ff
Máy chủ bảo vệ gia đình
AdGuard DNS sẽ chặn quảng cáo, trình theo dõi, nội dung người lớn và bật Tìm kiếm an toàn và Chế độ an toàn, nếu có thể.
2a10:50c0::bad1:ff
2a10:50c0::bad2:ff
Nhấn B để xác nhận thay đổi và thoát khỏi menu.
Nintendo 3DS
Áp dụng cho: New Nintendo 3DS, New Nintendo 3DS XL, New Nintendo 2DS XL, Nintendo 3DS, Nintendo 3DS XL và Nintendo 2DS.
Từ menu Trang chủ, chọn Cài đặt hệ thống.
Đi tới Cài đặt Internet → Cài đặt kết nối.
Chọn tệp kết nối, sau đó chọn Thay đổi cài đặt.
Chọn DNS, sau đó chọn Thiết lập.
Đặt Tự động lấy DNS thành Không.
Chọn Thiết lập chi tiết, sau đó chọn DNS chính. Giữ mũi tên trái để xóa DNS hiện có.
Nhập địa chỉ của một trong các máy chủ bên dưới. Chọn OK để quay lại màn hình DNS. Tương tự, nhập DNS phụ.
Máy chủ mặc định
AdGuard DNS sẽ chặn quảng cáo và trình theo dõi.
94.140.14.14
94.140.15.15
Máy chủ không lọc
AdGuard DNS sẽ không chặn quảng cáo, trình theo dõi hoặc bất kỳ yêu cầu DNS nào khác.
94.140.14.140
94.140.14.141
Máy chủ bảo vệ gia đình
AdGuard DNS sẽ chặn quảng cáo, trình theo dõi, nội dung dành cho người lớn và bật Tìm kiếm an toàn và Chế độ an toàn khi có thể.
94.140.14.15
94.140.15.16
Nhấn Lưu, sau đó nhấn OK.
Nintendo Switch
Bật máy Nintendo Switch của bạn và vào Menu Chính.
Vào Cài đặt hệ thống → Internet.
Chọn mạng Wi-Fi mà bạn muốn thay đổi cài đặt DNS.
Nhấp vào Thay đổi cài đặt cho mạng Wi-Fi đã chọn.
Cuộn xuống và chọn Cài đặt DNS.
Chọn Cẩm nang và sau đó nhập địa chỉ máy chủ DNS chính.
Máy chủ mặc định
AdGuard DNS sẽ chặn quảng cáo và trình theo dõi.
94.140.14.14
94.140.15.15
Máy chủ Non-filtering
AdGuard DNS sẽ không chặn quảng cáo, trình theo dõi hoặc bất kỳ Yêu cầu DNS nào khác.
94.140.14.140
94.140.14.141
Máy chủ bảo vệ gia đình
AdGuard DNS sẽ chặn quảng cáo, trình theo dõi và nội dung người lớn cũng như bật Tìm kiếm an toàn và Chế độ an toàn, nếu có thể.
94.140.14.15
94.140.15.16
(Tùy chọn) Nhập địa chỉ máy chủ DNS phụ. Đây là máy chủ DNS dự phòng mà Nintendo Switch của bạn sẽ sử dụng nếu máy chủ DNS chính không khả dụng.
Máy chủ mặc định
AdGuard DNS sẽ chặn quảng cáo và trình theo dõi.
94.140.14.14
94.140.15.15
Máy chủ Non-filtering
AdGuard DNS sẽ không chặn quảng cáo, trình theo dõi hoặc bất kỳ Yêu cầu DNS nào khác.
94.140.14.140
94.140.14.141
Máy chủ bảo vệ gia đình
AdGuard DNS sẽ chặn quảng cáo, trình theo dõi và nội dung người lớn cũng như bật Tìm kiếm an toàn và Chế độ an toàn, nếu có thể.
94.140.14.15
94.140.15.16
Chọn Cứu để cứu cài đặt DNS của bạn.
Kết nối lại với mạng Wi-Fi để áp dụng các thay đổi.
Steam Deck
Mở cài đặt Steam Deck bằng cách nhấp vào biểu tượng bánh răng ở góc trên bên phải màn hình.
Nhấp vào Mạng.
Nhấp vào biểu tượng bánh răng bên cạnh kết nối mạng bạn muốn cấu hình.
Chọn IPv4 hoặc IPv6, tùy thuộc vào loại mạng bạn đang sử dụng.
Chọn Chỉ địa chỉ tự động (DHCP) hoặc Tự động (DHCP).
Trong trường máy chủ DNS, nhập một trong các địa chỉ IP sau.
Máy chủ mặc định
AdGuard DNS sẽ chặn quảng cáo và trình theo dõi.
94.140.14.14
94.140.15.15
Máy chủ không lọc
AdGuard DNS sẽ không chặn quảng cáo, trình theo dõi hoặc bất kỳ yêu cầu DNS nào khác.
94.140.14.140
94.140.14.141
Máy chủ bảo vệ gia đình
AdGuard DNS sẽ chặn quảng cáo, trình theo dõi và nội dung người lớn và bật Tìm kiếm an toàn và Chế độ an toàn, nếu có thể.
94.140.14.15
94.140.15.16
Nếu bảng điều khiển của bạn hỗ trợ IPv6, hãy thêm chúng.
Máy chủ mặc định
AdGuard DNS sẽ chặn quảng cáo và trình theo dõi.
2a10:50c0::ad1:ff
2a10:50c0::ad2:ff
Máy chủ không lọc
AdGuard DNS sẽ không chặn quảng cáo, trình theo dõi hoặc bất kỳ yêu cầu DNS nào khác.
2a10:50c0::1:ff
2a10:50c0::2:ff
Máy chủ bảo vệ gia đình
AdGuard DNS sẽ chặn quảng cáo, trình theo dõi và nội dung người lớn và bật Tìm kiếm an toàn và Chế độ an toàn, nếu có thể.
2a10:50c0::bad1:ff
2a10:50c0::bad2:ff
Lưu các thay đổi.
Samsung Smart TV
Mở Cài đặt → mạng.
Chọn Network Status → IP Settings.
Nhấp vào cài đặt DNS, sau đó chọn Enter thủ công từ menu thả xuống.
Trong trường Máy chủ DNS, nhập một trong các địa chỉ máy chủ DNS sau.
Máy chủ mặc định
AdGuard DNS sẽ chặn quảng cáo và trình theo dõi.
94.140.14.14
94.140.15.15
Máy chủ không lọc
AdGuard DNS sẽ không chặn quảng cáo, trình theo dõi hoặc bất kỳ yêu cầu DNS nào khác.
94.140.14.140
94.140.14.141
Máy chủ bảo vệ gia đình
AdGuard DNS sẽ chặn quảng cáo, trình theo dõi và nội dung người lớn và bật Tìm kiếm an toàn và Chế độ an toàn, nếu có thể.
94.140.14.15
94.140.15.16
Lưu các thay đổi và khởi động lại TV Samsung của bạn.
LG
Mở Cài đặt → Tất cả cài đặt.
Nhấp vào Mạng và chọn mạng Wi-Fi của bạn.
Mở Cài đặt Wi-Fi nâng cao và nhấp vào Chỉnh sửa.
Bỏ chọn Đặt tự động.
Trong trường Máy chủ DNS, nhập một trong các địa chỉ máy chủ DNS sau.
Máy chủ mặc định
AdGuard DNS sẽ chặn quảng cáo và trình theo dõi.
94.140.14.14
94.140.15.15
Máy chủ không lọc
AdGuard DNS sẽ không chặn quảng cáo, trình theo dõi hoặc bất kỳ yêu cầu DNS nào khác.
94.140.14.140
94.140.14.141
Máy chủ bảo vệ gia đình
AdGuard DNS sẽ chặn quảng cáo, trình theo dõi và nội dung người lớn và bật Tìm kiếm an toàn và Chế độ an toàn, nếu có thể.
94.140.14.15
94.140.15.16
Nhấp vào Kết nối để lưu các thay đổi.
Android TV
Mở Cài đặt → Mạng &; Internet.
Chọn mạng Wi-Fi hoặc kết nối có dây của bạn.
Ghi lại địa chỉ IP của thiết bị của bạn. Bạn có thể tìm thấy nó dưới địa chỉ IP.
Cuộn xuống cài đặt IP và chọn Tĩnh.
Nhập địa chỉ IP của thiết bị của bạn.
Đối với Gateway, nhập địa chỉ IP của router. Bạn thường có thể tìm thấy nó trong cài đặt của bộ định tuyến hoặc bằng cách liên hệ với nhà cung cấp dịch vụ Internet của bạn.
Đối với độ dài tiền tố mạng, nhập: '24'
Đối với DNS 1, nhập địa chỉ máy chủ DNS chính.
Máy chủ mặc định
AdGuard DNS sẽ chặn quảng cáo và trình theo dõi.
94.140.14.14
94.140.15.15
Máy chủ không lọc
AdGuard DNS sẽ không chặn quảng cáo, trình theo dõi hoặc bất kỳ yêu cầu DNS nào khác.
94.140.14.140
94.140.14.141
Máy chủ bảo vệ gia đình
AdGuard DNS sẽ chặn quảng cáo, trình theo dõi và nội dung người lớn và bật Tìm kiếm an toàn và Chế độ an toàn, nếu có thể.
94.140.14.15
94.140.15.16
Đối với DNS 2, nhập địa chỉ máy chủ DNS phụ. Đây là máy chủ DNS dự phòng mà Android TV box của bạn sẽ sử dụng nếu máy chủ DNS chính không khả dụng.
Máy chủ mặc định
AdGuard DNS sẽ chặn quảng cáo và trình theo dõi.
94.140.14.14
94.140.15.15
Máy chủ không lọc
AdGuard DNS sẽ không chặn quảng cáo, trình theo dõi hoặc bất kỳ yêu cầu DNS nào khác.
94.140.14.140
94.140.14.141
Máy chủ bảo vệ gia đình
AdGuard DNS sẽ chặn quảng cáo, trình theo dõi và nội dung người lớn và bật Tìm kiếm an toàn và Chế độ an toàn, nếu có thể.
94.140.14.15
94.140.15.16
Lưu các thay đổi.
Apple TV
Mở Cài đặt → mạng.
Chọn mạng Wi-Fi hoặc kết nối có dây của bạn.
Nhấp vào Cấu hình DNS và chọn Thủ công.
Nhập một trong các địa chỉ máy chủ DNS sau.
Máy chủ mặc định
AdGuard DNS sẽ chặn quảng cáo và trình theo dõi.
94.140.14.14
94.140.15.15
Máy chủ không lọc
AdGuard DNS sẽ không chặn quảng cáo, trình theo dõi hoặc bất kỳ yêu cầu DNS nào khác.
94.140.14.140
94.140.14.141
Máy chủ bảo vệ gia đình
AdGuard DNS sẽ chặn quảng cáo, trình theo dõi và nội dung người lớn và bật Tìm kiếm an toàn và Chế độ an toàn, nếu có thể.
94.140.14.15
94.140.15.16
Nhấp vào Xong.
Fire TV
Mở Cài đặt → My Fire TV → Giới thiệu về mạng →.
Ghi lại địa chỉ IP, cổng và mặt nạ mạng con.
Quay lại Cài đặt và nhấp vào Mạng.
Chọn mạng của bạn và nhấp vào nút menu của điều khiển từ xa (☰) để quên nó.
Chọn lại mạng và nhập mật khẩu của bạn. Thay vì bấm Kết nối, bấm Nâng cao.
Nhập địa chỉ IP và cổng ghi lại.
Đối với Mặt nạ mạng con, nếu mặt nạ mạng con của bạn là 255.255.255.0, hãy nhập: '24' nếu mặt nạ mạng con của bạn là 255.255.255.255: '32'
Đối với DNS 1, nhập địa chỉ máy chủ DNS chính.
Máy chủ mặc định
AdGuard DNS sẽ chặn quảng cáo và trình theo dõi.
94.140.14.14
94.140.15.15
Máy chủ không lọc
AdGuard DNS sẽ không chặn quảng cáo, trình theo dõi hoặc bất kỳ yêu cầu DNS nào khác.
94.140.14.140
94.140.14.141
Máy chủ bảo vệ gia đình
AdGuard DNS sẽ chặn quảng cáo, trình theo dõi và nội dung người lớn và bật Tìm kiếm an toàn và Chế độ an toàn, nếu có thể.
94.140.14.15
94.140.15.16
Đối với DNS 2, nhập địa chỉ máy chủ DNS phụ. Đây là máy chủ DNS dự phòng mà Fire TV của bạn sẽ sử dụng nếu máy chủ DNS chính không khả dụng.
Máy chủ mặc định
AdGuard DNS sẽ chặn quảng cáo và trình theo dõi.
94.140.14.14
94.140.15.15
Máy chủ không lọc
AdGuard DNS sẽ không chặn quảng cáo, trình theo dõi hoặc bất kỳ yêu cầu DNS nào khác.
94.140.14.140
94.140.14.141
Máy chủ bảo vệ gia đình
AdGuard DNS sẽ chặn quảng cáo, trình theo dõi và nội dung người lớn và bật Tìm kiếm an toàn và Chế độ an toàn, nếu có thể.
94.140.14.15
94.140.15.16
Lưu các thay đổi.
Địa chỉ máy chủ của chúng tôi
Nếu bạn đã biết cách thiết lập DNS trên thiết bị của mình, hãy sử dụng những địa chỉ này
DNS-over-HTTPS
Máy chủ mặc định
AdGuard DNS sẽ chặn quảng cáo và trình theo dõi.
Máy chủ không lọc
AdGuard DNS sẽ không chặn quảng cáo, trình theo dõi hoặc bất kỳ yêu cầu DNS nào khác.
Máy chủ bảo vệ gia đình
AdGuard DNS sẽ chặn quảng cáo, trình theo dõi, nội dung người lớn và bật Tìm kiếm an toàn và Chế độ an toàn, nếu có thể.
DNS-over-TLS
Máy chủ mặc định
AdGuard DNS sẽ chặn quảng cáo và trình theo dõi.
tls://dns.adguard-dns.com
Máy chủ không lọc
AdGuard DNS sẽ không chặn quảng cáo, trình theo dõi hoặc bất kỳ yêu cầu DNS nào khác.
tls://unfiltered.adguard-dns.com
Máy chủ bảo vệ gia đình
AdGuard DNS sẽ chặn quảng cáo, trình theo dõi, nội dung người lớn và bật Tìm kiếm an toàn và Chế độ an toàn, nếu có thể.
tls://family.adguard-dns.com
DNS-over-QUIC
Máy chủ mặc định
AdGuard DNS sẽ chặn quảng cáo và trình theo dõi.
quic://dns.adguard-dns.com
Máy chủ không lọc
AdGuard DNS sẽ không chặn quảng cáo, trình theo dõi hoặc bất kỳ yêu cầu DNS nào khác.
quic://unfiltered.adguard-dns.com
Máy chủ bảo vệ gia đình
AdGuard DNS sẽ chặn quảng cáo, trình theo dõi, nội dung người lớn và bật Tìm kiếm an toàn và Chế độ an toàn, nếu có thể.
quic://family.adguard-dns.com
DNSCrypt
Máy chủ mặc định
AdGuard DNS sẽ chặn quảng cáo và trình theo dõi.
sdns://AQMAAAAAAAAAETk0LjE0MC4xNC4xNDo1NDQzINErR_JS3PLCu_iZEIbq95zkSV2LFsigxDIuUso_OQhzIjIuZG5zY3J5cHQuZGVmYXVsdC5uczEuYWRndWFyZC5jb20
Máy chủ không lọc
AdGuard DNS sẽ không chặn quảng cáo, trình theo dõi hoặc bất kỳ yêu cầu DNS nào khác.
sdns://AQMAAAAAAAAAEjk0LjE0MC4xNC4xNDA6NTQ0MyC16ETWuDo-PhJo62gfvqcN48X6aNvWiBQdvy7AZrLa-iUyLmRuc2NyeXB0LnVuZmlsdGVyZWQubnMxLmFkZ3VhcmQuY29t
Máy chủ bảo vệ gia đình
AdGuard DNS sẽ chặn quảng cáo, trình theo dõi, nội dung người lớn và bật Tìm kiếm an toàn và Chế độ an toàn, nếu có thể.
sdns://AQMAAAAAAAAAETk0LjE0MC4xNC4xNTo1NDQzILgxXdexS27jIKRw3C7Wsao5jMnlhvhdRUXWuMm1AFq6ITIuZG5zY3J5cHQuZmFtaWx5Lm5zMS5hZGd1YXJkLmNvbQ
DNS thuần
Máy chủ mặc định
AdGuard DNS sẽ chặn quảng cáo và trình theo dõi.
IPv4:
94.140.14.14
94.140.15.15
IPv6:
2a10:50c0::ad1:ff
2a10:50c0::ad2:ff
Máy chủ không lọc
AdGuard DNS sẽ không chặn quảng cáo, trình theo dõi hoặc bất kỳ yêu cầu DNS nào khác.
IPv4:
94.140.14.140
94.140.14.141
IPv6:
2a10:50c0::1:ff
2a10:50c0::2:ff
Máy chủ bảo vệ gia đình
AdGuard DNS sẽ chặn quảng cáo, trình theo dõi, nội dung người lớn và bật Tìm kiếm an toàn và Chế độ an toàn, nếu có thể.
IPv4:
94.140.14.15
94.140.15.16
IPv6:
2a10:50c0::bad1:ff
2a10:50c0::bad2:ff
Thử AdGuard DNS riêng tư
Một DNS công khai đáng tin cậy là tuyệt vời, nhưng bạn có ít quyền kiểm soát hơn và không thể thấy nó đang chặn gì và ở đâu. DNS riêng tư là cách để có một tường lửa ở cấp mạng của riêng bạn và tận hưởng quyền kiểm soát hoàn toàn đối với tất cả các thiết bị của bạn
Đã sao