パブリック AdGuard DNS サーバーに接続する方法
無料のパブリック AdGuard DNS サーバーを使って、広告、トラッカー、マルウェア、アダルトウェブサイトを素早くブロック。
【方法①】 AdGuard アプリをインストールする おすすめ
一番速くて簡単な方法です。DNSに接続したいデバイスに AdGuard 広告ブロッカーアプリをインストールし、アプリ内のサーバー設定で AdGuard DNS を選択するだけで完了です。DNSサーバーアドレスを手動で入力する手間もなし!
DNSに加えて、正確な広告ブロックと高度なトラッキング防止機能もご利用いただけます。
Windowsデバイスをシステムレベルで保護できます。
Macデバイスに追加のソフトをインストールせずに保護できます。
Androidデバイス中で広告、トラッカー、脅威をブロックできます。
iOSデバイスのブラウザやアプリを広告なしにできます。
【方法②】AdGuard DNS を手動で設定する
パブリック AdGuard DNS サーバーを手動で設定したい場合は、必要なものを全部ご用意しております。接続したいデバイスのプラットフォームを選択し、セットアップ手順に沿って設定してください。
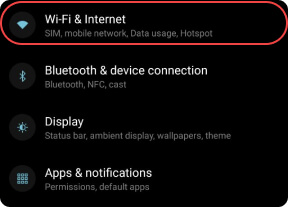
「設定」 → 「ネットワークとインターネット」 (もしくは「Wi-Fiとインターネット」や「接続」など)
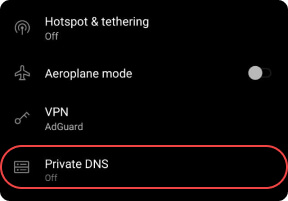
「詳細設定」(もしくは「その他の接続設定」) → 「プライベートDNS」
「プライベートDNSプロバイダのホスト名」を選択し以下のいずれを記入してください:
デフォルトサーバー
dns.adguard-dns.com
AdGuard DNSは広告とトラッカー(個人情報追跡)をブロックします。
フィルタリングなしサーバー
unfiltered.adguard-dns.com
AdGuard DNSは広告、トラッカー(個人情報追跡)やその他のDNSリクエストをブロックしません。
ファミリー保護サーバー
family.adguard-dns.com
AdGuard DNSは、広告、トラッカー、アダルトコンテンツをブロックし、できる限りセーフサーチとセーフモードを有効にします。
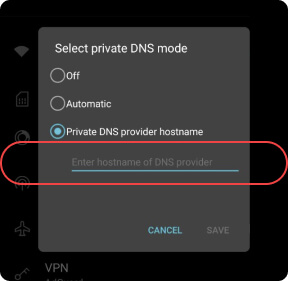
「保存」をタップしてください。
一般的な構成プロファイルを取得するには、以下でDNSサーバーを選択し、「構成プロファイルをダウンロード」をタップしてください。カスタム構成プロファイルを利用するは、「プロファイルコンストラクターを開く」をタップしてください。
プロファイルコンストラクタ
AdGuard DNSをネイティブに使用するための、iOS/macOS用構成プロファイルを生成できます。
1. DNSサーバーと暗号化方式をお選びください。
2. 以下のWi-Fiネットワークに対してAdGuard DNSを無効にしてください。
3.以下のドメイン(およびそのサブドメイン)に対してAdGuard DNSを無効にしてください。
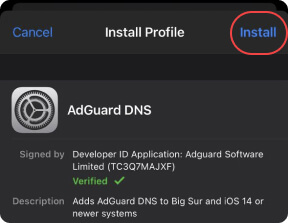
端末で「設定」アプリを開きます。
「プロファイルがダウンロードされました」をタップします。
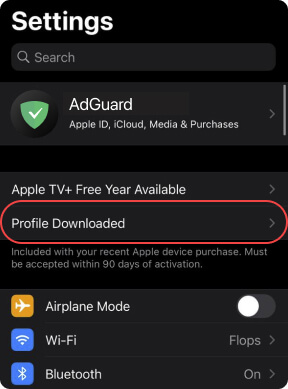
「インストール」をタップして、画面上の手順を行います。
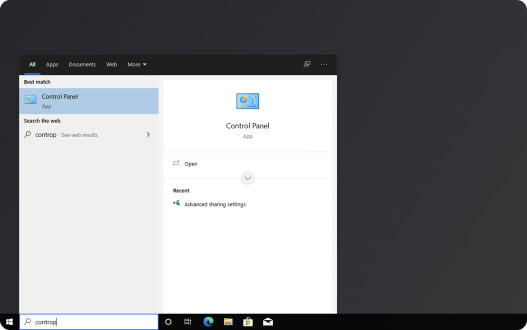
スタートメニュー → コントロールパネル
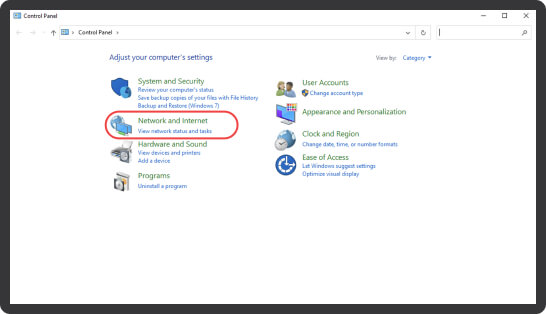
「ネットワークとインターネット」をクリックします。
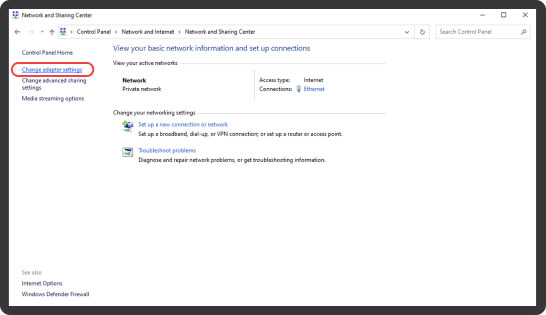
「ネットワークと共有センター」をクリックします。

左側のメニューから「アダプターの設定の変更」を選択します。
現在接続しているWi-Fiネットワークをクリックします。
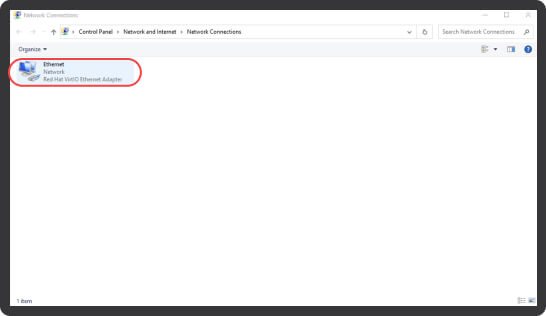
接続アイコンの上のバーで、「この接続の設定を変更する」というオプションを見つけて選択してください。(※このオプションは、例のメニューバーにある2つの小さな矢印アイコンをクリックすると表示されるドロップダウンメニューの中に隠れていることがあります。)
または、接続アイコンを右クリックし、「プロパティ」を選択します。

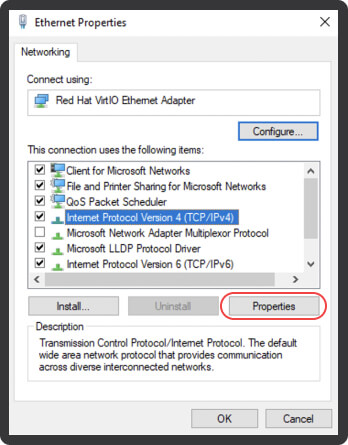
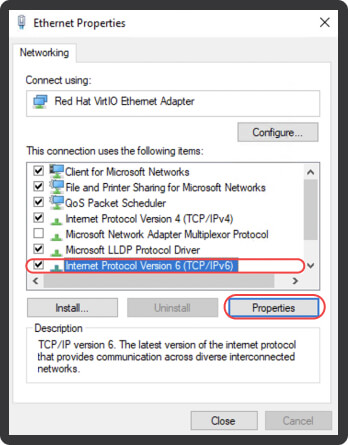
「インターネット プロトコル バージョン 4」を選択します。
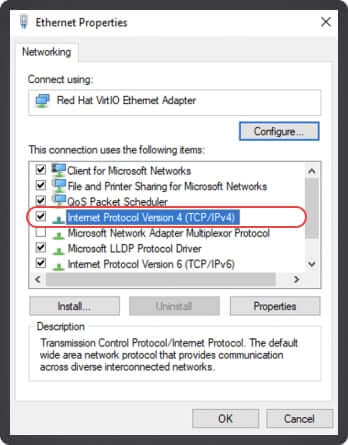
「プロパティ」をクリックします。
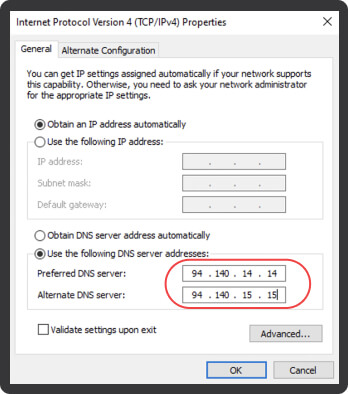
「次のDNSサーバーアドレスを使う」をクリックします。
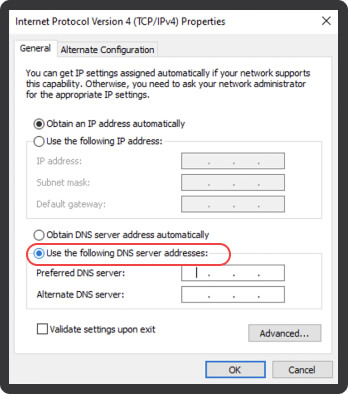
以下のいずれかのサーバーを1つ選択し、「優先 DNS サーバー」および「代替 DNS サーバー」のテキストフィールドにそのアドレスを入力します。
デフォルトサーバー
AdGuard DNSは広告とトラッカー(個人情報追跡)をブロックします。
94.140.14.14
94.140.15.15
フィルタリングなしサーバー
AdGuard DNSは広告、トラッカー(個人情報追跡)やその他のDNSリクエストをブロックしません。
94.140.14.140
94.140.14.141
ファミリー保護サーバ
AdGuard DNSは、広告、トラッカー、アダルトコンテンツをブロックし、できる限りセーフサーチとセーフモードを有効にします。
94.140.14.15
94.140.15.16
「OK」をクリックします。
今度は、「インターネット プロトコル バージョン 6」→「プロパティ」へ進みます。
「次のDNSサーバーアドレスを使う」をクリックします。
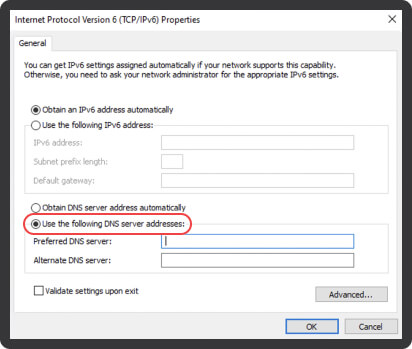
以下のいずれかのサーバーを1つ選択し、「優先 DNS サーバー」および「代替 DNS サー バー」のテキストフィールドにそのアドレスを入力します。
デフォルトサーバー
AdGuard DNSは広告とトラッカー(個人情報追跡)をブロックします。
2a10:50c0::ad1:ff
2a10:50c0::ad2:ff
フィルタリングなしサーバー
AdGuard DNSは広告、トラッカー(個人情報追跡)やその他のDNSリクエストをブロックしません。
2a10:50c0::1:ff
2a10:50c0::2:ff
ファミリー保護サーバー
AdGuard DNSは、広告、トラッカー、アダルトコンテンツをブロックし、できる限りセーフサーチとセーフモードを有効にします。
2a10:50c0::bad1:ff
2a10:50c0::bad2:ff
「OK」をクリックします。
「閉じる」をクリックします。
macOS Sequoia 15.5 以降の場合
お好みに応じてDNSサーバーを選択し、ボタンを押して構成プロファイルをダウンロードしてください。
プロファイルコンストラクタ
AdGuard DNSをネイティブに使用するための、iOS/macOS用構成プロファイルを生成できます。
1. DNSサーバーと暗号化方式をお選びください。
2. 以下のWi-Fiネットワークに対してAdGuard DNSを無効にしてください。
3.以下のドメイン(およびそのサブドメイン)に対してAdGuard DNSを無効にしてください。
画面左上のアップル(🍏)メニュー → 「システム設定」を選択します。
サイドバーの「プロファイルダウンロード済み」をクリックし、インストールするプロファイルをダブルクリックしてください。
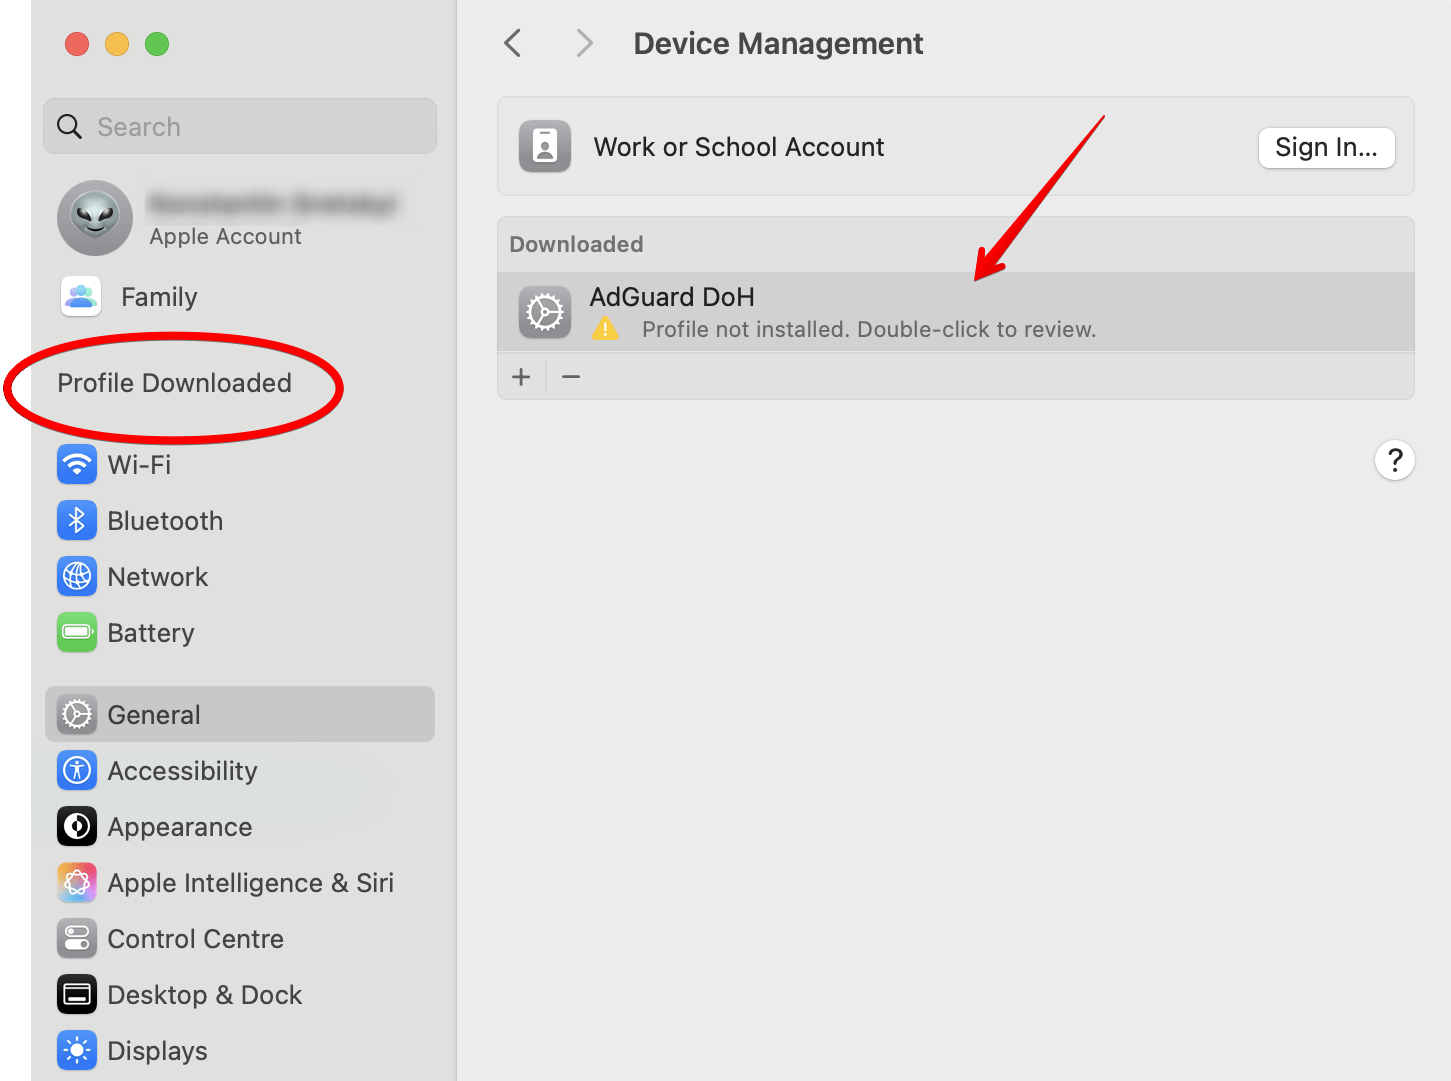
管理者パスワードを入力し、「OK」をクリックします。
完了です!お使いのデバイスは正常に AdGuard DNS に接続されています。
macOS VenturaおよびmacOS Sequoia 15.4の場合
お好みに応じてDNSサーバーを選択し、ボタンを押して構成プロファイルをダウンロードしてください。
プロファイルコンストラクタ
AdGuard DNSをネイティブに使用するための、iOS/macOS用構成プロファイルを生成できます。
1. DNSサーバーと暗号化方式をお選びください。
2. 以下のWi-Fiネットワークに対してAdGuard DNSを無効にしてください。
3.以下のドメイン(およびそのサブドメイン)に対してAdGuard DNSを無効にしてください。
画面左上のアップル(🍏)メニュー → 「システム設定」を選択し、「プライバシーとセキュリティ」をクリックし、右側の「プロファイル」をクリックします。(スクロールダウンする必要がある場合があります。)
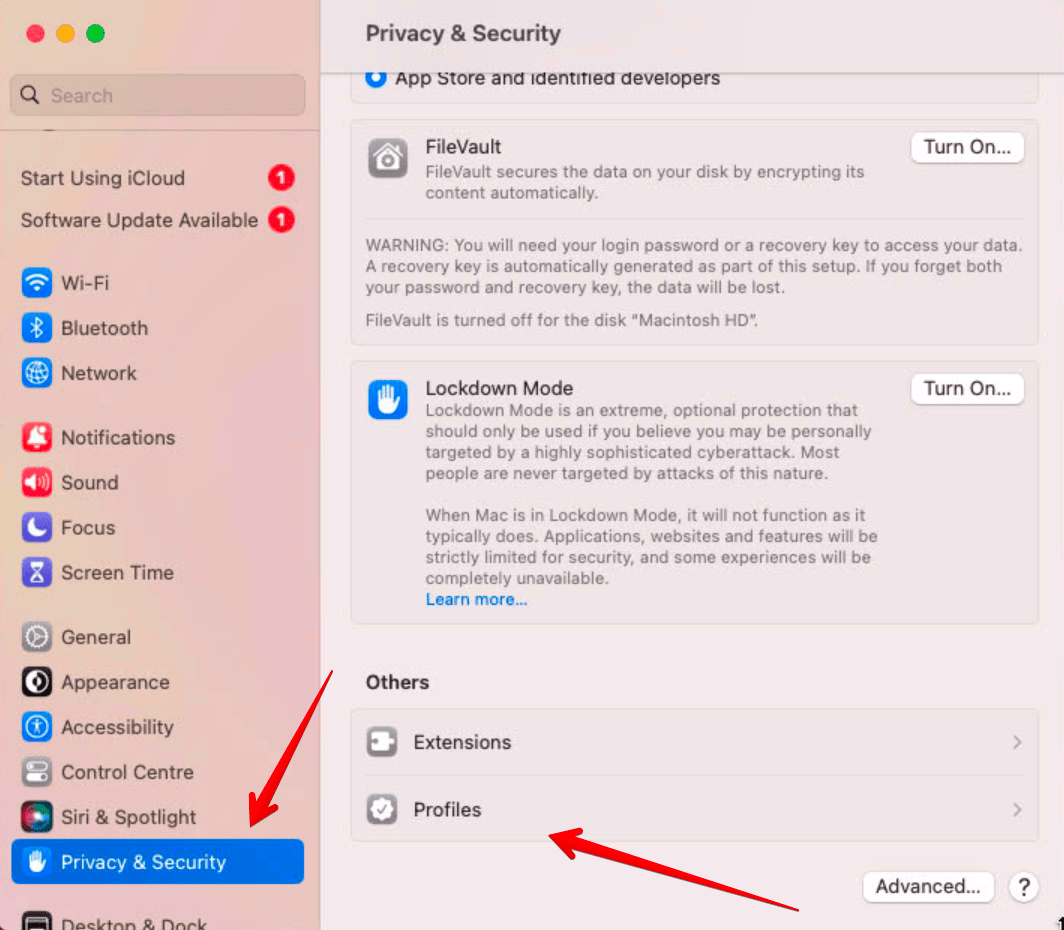
「ダウンロード済み」セクションで、プロファイルをダブルクリックすることでインストールします。

管理者パスワードを入力し、「OK」をクリックします。
完了です!お使いのデバイスは正常に AdGuard DNS に接続されています。
macOS Big Sur および macOS Monterey の場合
お好みに応じてDNSサーバーを選択し、ボタンを押して構成プロファイルをダウンロードしてください。
プロファイルコンストラクタ
AdGuard DNSをネイティブに使用するための、iOS/macOS用構成プロファイルを生成できます。
1. DNSサーバーと暗号化方式をお選びください。
2. 以下のWi-Fiネットワークに対してAdGuard DNSを無効にしてください。
3.以下のドメイン(およびそのサブドメイン)に対してAdGuard DNSを無効にしてください。
「システム環境設定」を開きます。
「プロファイル」を選択します。
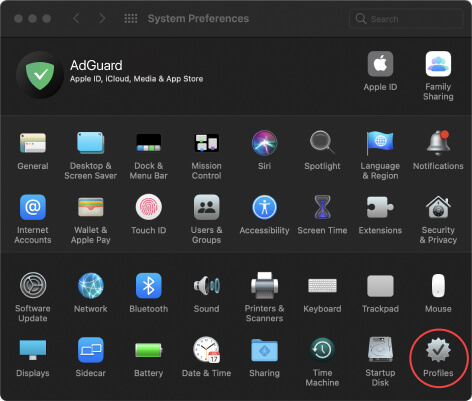
ダウンロードされたAdGuard DNSプロファイルを選択し、「インストール」をクリックします。
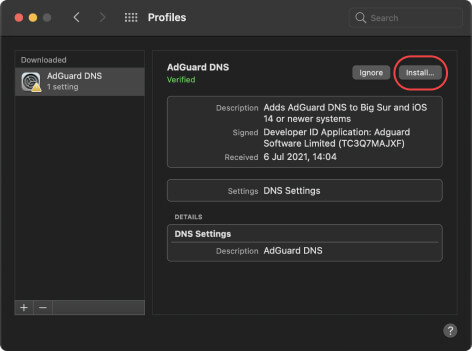
完了です!お使いのデバイスは正常に AdGuard DNS に接続されています。
AdGuard Home
AdGuard Homeをお試しください。広告やトラッカー(個人情報追跡)をブロックし、ホームネットワークを管理できるようにする強力なツールです。一度インストールして設定しておけば、AdGuard Homeは、クライアント側のソフトウェアを必要とせずに、自宅のWi-Fiに接続されたすべてのデバイスを保護します。
詳しくは、私たちのGitHubリポジトリをご覧ください。
Ubuntu
「システム」(もしくは「システム環境設定」)を開きます。
無線接続の場合は「Wi-Fi」、有線接続の場合は「ネットワーク」を選択し、必要な接続の横にある歯車をクリックします。
「IPv4」を選択します。
以下のいずれかのDNSサーバーのアドレスを入力してください:
デフォルトサーバー
AdGuard DNSは広告とトラッカー(個人情報追跡)をブロックします。
94.140.14.14
94.140.15.15
フィルタリングなしサーバー
AdGuard DNSは広告、トラッカー(個人情報追跡)やその他のDNSリクエストをブロックしません。
94.140.14.140
94.140.14.141
ファミリー保護サーバ
AdGuard DNSは、広告、トラッカー、アダルトコンテンツをブロックし、できる限りセーフサーチとセーフモードを有効にします。
94.140.14.15
94.140.15.16
「自動モード」をオフにします。
「適用」をクリックします。
「IPv6」を選択します。
以下のいずれかのDNSサーバーのアドレスを入力してください:
デフォルトサーバー
AdGuard DNSは広告とトラッカー(個人情報追跡)をブロックします。
2a10:50c0::ad1:ff
2a10:50c0::ad2:ff
フィルタリングなしサーバー
AdGuard DNSは広告、トラッカー(個人情報追跡)やその他のDNSリクエストをブロックしません。
2a10:50c0::1:ff
2a10:50c0::2:ff
ファミリー保護サーバー
AdGuard DNSは、広告、トラッカー、アダルトコンテンツをブロックし、できる限りセーフサーチとセーフモードを有効にします。
2a10:50c0::bad1:ff
2a10:50c0::bad2:ff
DNS欄の横の「自動」スイッチをオフにします。
「適用」をクリックします。
変更を適用するには、Wi-Fiネットワークを再起動してください。
Debian
ターミナルを開きます。
コマンドラインで、次のように入力します:
suルートパスワードを入力します。
コマンドラインで、次のように入力します:
nano /etc/resolv.confテキストエディタが開いたら、以下のいずれかのサーバーのアドレスを入力してください:
デフォルトサーバー
広告やトラッカー(個人情報追跡)をブロックしたい場合
IPv4:
94.140.14.14~ ~~94.140.15.15
IPv6:
2a10:50c0::ad1:ff~ ~~2a10:50c0::ad2:ff
フィルタリングなしサーバー
広告、トラッカーやその他のDNSリクエストをブロックしたくない場合
IPv4:
94.140.14.140
94.140.14.141
IPv6:
2a10:50c0::1:ff
2a10:50c0::2:ff
ファミリー保護サーバー
アダルトコンテンツをブロックし、可能な限りセーフサーチやセーフモードを有効にし、広告やトラッカーもブロックしたい場合
IPv4:
94.140.14.15
94.140.15.16
IPv6:
2a10:50c0::bad1:ff
2a10:50c0::bad2:ff
キーボードで「Ctrl + O」を押して、ファイルを保存します。
キーボードで「Enter」を押します。
キーボードで「Ctrl + X 」を押して、エディタを終了します。
コマンドラインで、次のように入力します:
/etc/init.d/networking restartキーボードで「Enter」を押します。
ターミナルを閉じます。
お使いのルーターの環境設定を開きます。通常、ブラウザからアクセスできます。お使いのルーターのモデルに応じて、以下のアドレスのいずれかをブラウザで入力してください。
Linksys や Asus ルーター: http://192.168.1.1
D-Link ルーター: http://192.168.0.1
Ubiquiti ルーター: http://unifi.ubnt.com
ルーターのログイン名とパスワードを入力してください(多くの場合、出荷時のユーザー名、パスワードは「admin」と「password」、もしくは両方とも「admin」です)。
※ルーターのパスワードは安全な場所に記録しておいてください。ルーターのモデルによっては、特定のパスワード管理アプリケーションがあったりします。それのようなモデルをお持ちの場合、アプリケーションはすでにコンピュータにインストールされているはずです。
ルータの管理ページでDNS設定を見つけます。以下のAdGuard DNSサーバーのいずれかを選択いただいて、設定の既存DNSアドレスを以下のAdGuard DNSサーバーのアドレスに置き換えてください:
デフォルトサーバー
広告やトラッカー(個人情報追跡)をブロックしたい場合
IPv4:
94.140.14.14
94.140.15.15
IPv6:
2a10:50c0::ad1:ff
2a10:50c0::ad2:ff
フィルタリングなしサーバー
広告やトラッカーなどのDNSリクエストをブロックしたくない場合
IPv4:
94.140.14.140
94.140.14.141
IPv6:
2a10:50c0::1:ff
2a10:50c0::2:ff
ファミリー保護サーバー
アダルトコンテンツをブロックし、可能な限りセーフサーチやセーフモードを有効にし、広告やトラッカーもブロックしたい場合
IPv4:
94.140.14.15
94.140.15.16
IPv6:
2a10:50c0::bad1:ff
2a10:50c0::bad2:ff
変更を保存してください。
PS4
「設定」→「ネットワーク」へ進みます。
「インターネット接続を設定」に進みます。
お使いのものに応じて、「Wi-Fi」または「LANケーブル」を選択します。
「カスタム」を選択します。
「IPアドレス設定」を「自動」にします。
「DHCPホスト名」を「指定しない」に設定します。
「DNS設定」を「手動」にします。
以下のサーバーを1つ選択し、既存のDNSアドレスを以下のものに変更してください。
デフォルトサーバー
広告やトラッカー(個人情報追跡)をブロックしたい場合
94.140.14.14
94.140.15.15
フィルタリングなしサーバー
広告、トラッカーやその他のDNSリクエストをブロックしたくない場合
94.140.14.140
94.140.14.141
ファミリー保護サーバ
アダルトコンテンツをブロックし、可能な限りセーフサーチやセーフモードを有効にし、広告やトラッカーもブロックしたい場合
94.140.14.15
94.140.15.16
お使いのコンソールにIPv6アドレスを設定するオプションがある場合は、IPv6アドレスも追加してください:
デフォルトサーバー
広告やトラッカー(個人情報追跡)をブロックしたい場合
2a10:50c0::ad1:ff
2a10:50c0::ad2:ff
フィルタリングなしサーバー
広告、トラッカーやその他のDNSリクエストをブロックしたくない場合
2a10:50c0::1:ff
2a10:50c0::2:ff
ファミリー保護サーバー
アダルトコンテンツをブロックし、可能な限りセーフサーチやセーフモードを有効にし、広告やトラッカーもブロックしたい場合
2a10:50c0::bad1:ff
2a10:50c0::bad2:ff
「MTU設定」を「自動」にします。
「プロキシサーバー」を「使用しない」に設定します。
PS5
PS5本体の電源を入れ、アカウントにサインインします。
PS5のホーム画面から、画面右上にある「設定」アイコン(⚙アイコン)を選択します。
[設定]メニューで、[ネットワーク]を選択します。
[ネットワーク] の下にある[設定]を選択します。
お使いのネットワークを選択し、[インターネット接続を設定する]を選択します。
[カスタム] を選択し、[DNS設定]を選択します。
[手動] を選択し、プライマリDNSサーバーのアドレスを入力します:
デフォルトサーバー
広告とトラッカーをブロックする AdGuard DNS サーバーです。
94.140.14.14
94.140.15.15
フィルタリングなしサーバー
広告とトラッカーやその他のDNS要求をブロックしない AdGuard DNS サーバーです。
94.140.14.140
94.140.14.141
ファミリー保護サーバー
広告、トラッカー、アダルトコンテンツをブロックし、可能な限りセーフサーチとセーフモードを有効にする AdGuard DNS サーバーです。
94.140.14.15
94.140.15.16
(任意) セカンダリDNSサーバーのアドレスを入力してください。これは、プライマリDNSサーバーが利用不可能な場合にPS5が使用するバックアップDNSサーバーとなります:
デフォルトサーバー
広告とトラッカーをブロックする AdGuard DNS サーバーです。
94.140.14.14
94.140.15.15
フィルタリングなしサーバー
広告とトラッカーやその他のDNS要求をブロックしない AdGuard DNS サーバーです。
94.140.14.140
94.140.14.141
ファミリー保護サーバー
広告、トラッカー、アダルトコンテンツをブロックし、可能な限りセーフサーチとセーフモードを有効にする AdGuard DNS サーバーです。
94.140.14.15
94.140.15.16
コンソールがIPv6をサポートしている場合、IPv6アドレスも追加してください。
デフォルトサーバー
広告とトラッカーをブロックする AdGuard DNS サーバーです。
2a10:50c0::ad1:ff
2a10:50c0::ad2:ff
フィルタリングなしサーバー
広告とトラッカーやその他のDNS要求をブロックしない AdGuard DNS サーバーです。
2a10:50c0::1:ff
2a10:50c0::2:ff
ファミリー保護サーバー
広告、トラッカー、アダルトコンテンツをブロックし、可能な限りセーフサーチとセーフモードを有効にする AdGuard DNS サーバーです。
2a10:50c0::bad1:ff
2a10:50c0::bad2:ff
「次へ」を選択して続行します。
次の画面で、「MTU設定」の「自動」を選択します。
[プロキシサーバー] 画面で [使用しない] を選択します。
[インターネット接続のテスト] を選択して、この新しいDNS 設定をテストします。
テストが完了し、「Internet Connection: Successful」(インターネット接続:成功)と表示されたら、「確認」を選択して、設定を保存します。
PS5を再起動すると、変更が適用されます。
Xbox
コントローラーのXboxボタンを押してガイドを開きます。
「プロファイルとシステム」→「設定」→「一般」→「ネットワーク設定」を選択します。
「詳細設定」→「DNSの設定」に進みます。
「手動」を選択します。
以下のサーバーを1つ選択し、既存のDNSアドレスを以下のものに変更します。
デフォルトサーバー
広告やトラッカー(個人情報追跡)をブロックしたい場合
94.140.14.14
94.140.15.15
フィルタリングなしサーバー
広告、トラッカーやその他のDNSリクエストをブロックしたくない場合
94.140.14.140
94.140.14.141
ファミリー保護サーバ
アダルトコンテンツをブロックし、可能な限りセーフサーチやセーフモードを有効にし、広告やトラッカーもブロックしたい場合
94.140.14.15
94.140.15.16
お使いのコンソールにIPv6アドレスを設定するオプションがある場合は、IPv6アドレスも追加してください:
デフォルトサーバー
広告やトラッカー(個人情報追跡)をブロックしたい場合
2a10:50c0::ad1:ff
2a10:50c0::ad2:ff
フィルタリングなしサーバー
広告、トラッカーやその他のDNSリクエストをブロックしたくない場合
2a10:50c0::1:ff
2a10:50c0::2:ff
ファミリー保護サーバー
アダルトコンテンツをブロックし、可能な限りセーフサーチやセーフモードを有効にし、広告やトラッカーもブロックしたい場合
2a10:50c0::bad1:ff
2a10:50c0::bad2:ff
「B」ボタンを押して変更を確認します。
Nintendo 3DS
対応デバイス: New Nintendo 3DS、New Nintendo 3DS XL、New Nintendo 2DS XL、Nintendo 3DS、Nintendo 3DS XL、Nintendo 2DS
ホームメニューから、「システム設定」を選択します。
[インターネット設定] → [接続設定] に移動します。
接続ファイルを選択し、[設定を変更] を選択します。
[DNS] を選択し、[セットアップ] を選択します。
[DNS の自動取得] を [いいえ] に設定します。
[詳細設定] を選択し、[プライマリ DNS] を選択します。左矢印を長押しすることで、既存の DNS を削除します。
以下のいずれかのサーバーのアドレスを入力します。[OK] を選択して DNS 画面に戻ります。同様に、[セカンダリ DNS] を入力します。
デフォルトサーバー
広告とトラッカーをブロックする AdGuard DNS サーバーです。
94.140.14.14
94.140.15.15
フィルタリングなしサーバー
広告、トラッカーやその他のDNSリクエストをブロックしない AdGuard DNS サーバーです。
94.140.14.140
94.140.14.141
ファミリー保護サーバー
広告、トラッカー、アダルトコンテンツをブロックし、可能な場合はセーフサーチとセーフモードを有効にする AdGuard DNS サーバーです。
94.140.14.15
94.140.15.16
[保存] を押して、[OK] を押します。
Nintendo Switch
Nintendo Switch本体の電源を入れ、ホームメニューに移動します。
[本体設定] → [インターネット] に移動します。
DNS設定を変更したいWi-Fiネットワークを選択します。
選択したWi-Fiネットワークの [設定の変更] をクリックします。
下にスクロールして [DNS設定] を選択します。
[手動] を選択し、プライマリDNSサーバーのアドレスを入力します。
デフォルトサーバー
広告とトラッカーをブロックする AdGuard DNS サーバーです。
94.140.14.14
94.140.15.15
フィルタリングなしサーバー
広告、トラッカーやその他のDNSリクエストをブロックしない AdGuard DNS サーバーです。
94.140.14.140
94.140.14.141
ファミリー保護サーバー
広告、トラッカー、アダルトコンテンツをブロックし、可能な場合はセーフサーチとセーフモードを有効にする AdGuard DNS サーバーです。
94.140.14.15
94.140.15.16
【任意】 セカンダリDNSサーバーのアドレスを入力します。これは、プライマリDNSサーバーが利用できない場合にNintendo Switchが使用するバックアップDNSサーバーです。
デフォルトサーバー
広告とトラッカーをブロックする AdGuard DNS サーバーです。
94.140.14.14
94.140.15.15
フィルタリングなしサーバー
広告、トラッカーやその他のDNSリクエストをブロックしない AdGuard DNS サーバーです。
94.140.14.140
94.140.14.141
ファミリー保護サーバー
広告、トラッカー、アダルトコンテンツをブロックし、可能な場合はセーフサーチとセーフモードを有効にする AdGuard DNS サーバーです。
94.140.14.15
94.140.15.16
DNS設定を保存するために、[保存] を選択します。
変更を適用するには、Wi-Fiネットワークに再接続してください。
Steam Deck
画面右上の歯車アイコン⚙をクリックし、Steam Deckの設定を開きます。
[ネットワーク] をクリックします。
設定したいネットワーク接続の横にある歯車アイコン⚙を押します。
使用しているネットワークの種類に応じて、IPv4 または IPv6 を選択します。
[自動(DHCP)アドレスのみ]または[自動(DHCP)]を選択します。
[DNS サーバー] フィールドに、次の IP アドレスのいずれかを入力します。
デフォルトサーバー
広告とトラッカー(個人情報追跡)をブロックする AdGuard DNS サーバーです。
94.140.14.14
94.140.15.15
フィルタリングなしサーバー
広告とトラッカーやその他のDNS要求をブロックしない AdGuard DNS サーバーです。
94.140.14.140
94.140.14.141
ファミリー保護サーバー
広告、トラッカー、アダルトコンテンツをブロックし、可能な限りセーフサーチとセーフモードを有効にする AdGuard DNS サーバーです。
94.140.14.15
94.140.15.16
コンソールがIPv6をサポートしている場合、IPv6アドレスも追加してください。
デフォルトサーバー
広告とトラッカーをブロックする AdGuard DNS サーバーです。
2a10:50c0::ad1:ff
2a10:50c0::ad2:ff
フィルタリングなしサーバー
広告とトラッカーやその他のDNS要求をブロックしない AdGuard DNS サーバーです。
2a10:50c0::1:ff
2a10:50c0::2:ff
ファミリー保護サーバー
広告、トラッカー、アダルトコンテンツをブロックし、可能な限りセーフサーチとセーフモードを有効にする AdGuard DNS サーバーです。
2a10:50c0::bad1:ff
2a10:50c0::bad2:ff
変更を保存してください。
Samsung Smart TV
「設定」 → 「ネットワーク」を開きます。
「ネットワークの状態」 → 「IP設定」を選択します。
「DNS設定」をクリックし、ドロップダウンメニューから[手動で入力]を選択します。
[DNS サーバー] フィールドに、次の DNS サーバー アドレスのいずれかを入力します。
デフォルトサーバー
広告とトラッカー(個人情報追跡)をブロックする AdGuard DNS サーバーです。
94.140.14.14
94.140.15.15
フィルタリングなしサーバー
広告とトラッカーやその他のDNS要求をブロックしない AdGuard DNS サーバーです。
94.140.14.140
94.140.14.141
ファミリー保護サーバー
広告、トラッカー、アダルトコンテンツをブロックし、可能な限りセーフサーチとセーフモードを有効にする AdGuard DNS サーバーです。
94.140.14.15
94.140.15.16
変更を保存して、Samsung TV を再起動します。
LG
[設定] → [すべての設定] を開きます。
[ネットワーク] をクリックし、お使いのWi-Fiネットワークを選択します。
[Wi-Fiの詳細設定] を開き、[編集]をクリックします。
[自動的に設定する] のチェックをはずします。
[DNSサーバー] フィールドに、次の DNS サーバー アドレスのいずれかを入力します。
デフォルトサーバー
広告とトラッカー(個人情報追跡)をブロックする AdGuard DNS サーバーです。
94.140.14.14
94.140.15.15
フィルタリングなしサーバー
広告とトラッカーやその他のDNS要求をブロックしない AdGuard DNS サーバーです。
94.140.14.140
94.140.14.141
ファミリー保護サーバー
広告、トラッカー、アダルトコンテンツをブロックし、可能な限りセーフサーチとセーフモードを有効にする AdGuard DNS サーバーです。
94.140.14.15
94.140.15.16
[接続] をクリックすることで変更を保存します。
Android TV
「設定」 → 「ネットワークとインターネット」を開きます。
「Wi-Fiネットワーク」または「有線接続」を選択します。
お使いの端末のIPアドレスをメモします。「IPアドレス」のところで確認できます。
「IP設定」までスクロールし、「静的」を選択します。
「静的」を選択し、お使いのデバイスのIPアドレスを入力します。
ゲートウェイには、ルーターのIPアドレスを入力します。(通常、ルーターの設定に記載されているか、インターネットプロバイダーに問い合わせることで確認することができます。)
「ネットワーク接頭辞の長さ」は、次のように入力します:
24「DNS 1」には、プライマリDNSサーバーのアドレスを入力します。
デフォルトサーバー
広告とトラッカー(個人情報追跡)をブロックする AdGuard DNS サーバーです。
94.140.14.14
94.140.15.15
フィルタリングなしサーバー
広告とトラッカーやその他のDNS要求をブロックしない AdGuard DNS サーバーです。
94.140.14.140
94.140.14.141
ファミリー保護サーバー
広告、トラッカー、アダルトコンテンツをブロックし、可能な限りセーフサーチとセーフモードを有効にする AdGuard DNS サーバーです。
94.140.14.15
94.140.15.16
「DNS 2」には、セカンダリDNSサーバーのアドレスを入力します。これは、プライマリ DNS サーバーが使用できない場合に Android TV box が使用するバックアップ DNS サーバーとなりす。
デフォルトサーバー
広告とトラッカー(個人情報追跡)をブロックする AdGuard DNS サーバーです。
94.140.14.14
94.140.15.15
フィルタリングなしサーバー
広告とトラッカーやその他のDNS要求をブロックしない AdGuard DNS サーバーです。
94.140.14.140
94.140.14.141
ファミリー保護サーバー
広告、トラッカー、アダルトコンテンツをブロックし、可能な限りセーフサーチとセーフモードを有効にする AdGuard DNS サーバーです。
94.140.14.15
94.140.15.16
変更を保存します。
Apple TV
「設定」 → 「ネットワーク」を開きます。
「Wi-Fiネットワーク」または「有線接続」を選択します。
「DNSを設定する」をクリックし、[手動]を選択します。
以下のDNSサーバーアドレスのいずれかを入力します。
デフォルトサーバー
広告とトラッカー(個人情報追跡)をブロックする AdGuard DNS サーバーです。
94.140.14.14
94.140.15.15
フィルタリングなしサーバー
広告とトラッカーやその他のDNS要求をブロックしない AdGuard DNS サーバーです。
94.140.14.140
94.140.14.141
ファミリー保護サーバー
広告、トラッカー、アダルトコンテンツをブロックし、可能な限りセーフサーチとセーフモードを有効にする AdGuard DNS サーバーです。
94.140.14.15
94.140.15.16
「完了」をクリックします。
Fire TV
設定 → My Fire TV → Fire TVについて → ネットワーク を開きます。
IPアドレス、ゲートウェイ、サブネットマスクをメモします。
[設定] に戻り、[ネットワーク]をクリックします。
お使いのネットワークを選択し、リモコンのメニューボタン(☰)をクリックして、ネットワークを忘れます。
再度ネットワークを選択し、パスワードを入力します。[接続] をクリックする代わりに、[詳細設定] をクリックします。
書き留めたIPアドレスとゲートウェイを入力します。
サブネットマスクは、255.255.255.0の場合、
24と入力します。サブネットマスクが255.255.255.255の場合は、32と入力します。「DNS 1」には、プライマリDNSサーバーのアドレスを入力してください。
デフォルトサーバー
広告とトラッカー(個人情報追跡)をブロックする AdGuard DNS サーバーです。
94.140.14.14
94.140.15.15
フィルタリングなしサーバー
広告とトラッカーやその他のDNS要求をブロックしない AdGuard DNS サーバーです。
94.140.14.140
94.140.14.141
ファミリー保護サーバー
広告、トラッカー、アダルトコンテンツをブロックし、可能な限りセーフサーチとセーフモードを有効にする AdGuard DNS サーバーです。
94.140.14.15
94.140.15.16
「DNS 2」には、セカンダリDNSサーバーのアドレスを入力します。これは、プライマリ DNS サーバーが使用できない場合に Fire TV が使用するバックアップ DNS サーバーとなりす。
デフォルトサーバー
広告とトラッカー(個人情報追跡)をブロックする AdGuard DNS サーバーです。
94.140.14.14
94.140.15.15
フィルタリングなしサーバー
広告とトラッカーやその他のDNS要求をブロックしない AdGuard DNS サーバーです。
94.140.14.140
94.140.14.141
ファミリー保護サーバー
広告、トラッカー、アダルトコンテンツをブロックし、可能な限りセーフサーチとセーフモードを有効にする AdGuard DNS サーバーです。
94.140.14.15
94.140.15.16
変更を保存します。
私たちのサーバーアドレス
お使いのデバイスでDNSを設定する方法をすでにご存知の場合は、以下のアドレスを使用してください:
DNS-over-HTTPS
デフォルトサーバー
AdGuard DNSは、広告とトラッカー(個人情報追跡)をブロックします。
フィルタリングなしサーバー
AdGuard DNSは、広告、トラッカー(個人情報追跡)やその他のDNSリクエストをブロックしません。
ファミリー保護サーバー
AdGuard DNSは、広告、トラッカー、アダルトコンテンツをブロックし、できる限りセーフサーチとセーフモードを有効にします。
DNS-over-TLS
デフォルトサーバー
AdGuard DNSは、広告とトラッカー(個人情報追跡)をブロックします。
%tls://dns.adguard-dns.com
フィルタリングなしサーバー
AdGuard DNSは、広告、トラッカー(個人情報追跡)やその他のDNSリクエストをブロックしません。
tls://unfiltered.adguard-dns.com
ファミリー保護サーバー
AdGuard DNSは、広告、トラッカー、アダルトコンテンツをブロックし、できる限りセーフサーチとセーフモードを有効にします。
tls://family.adguard-dns.com
DNS-over-QUIC
デフォルトサーバー
AdGuard DNSは、広告とトラッカー(個人情報追跡)をブロックします。
quic://dns.adguard-dns.com
フィルタリングなしサーバー
AdGuard DNSは、広告、トラッカー(個人情報追跡)やその他のDNSリクエストをブロックしません。
quic://unfiltered.adguard-dns.com
ファミリー保護サーバー
AdGuard DNSは、広告、トラッカー、アダルトコンテンツをブロックし、できる限りセーフサーチとセーフモードを有効にします。
quic://family.adguard-dns.com
DNSCrypt
デフォルトサーバー
AdGuard DNSは、広告とトラッカー(個人情報追跡)をブロックします。
sdns://AQMAAAAAAAAAETk0LjE0MC4xNC4xNDo1NDQzINErR_JS3PLCu_iZEIbq95zkSV2LFsigxDIuUso_OQhzIjIuZG5zY3J5cHQuZGVmYXVsdC5uczEuYWRndWFyZC5jb20
フィルタリングなしサーバー
AdGuard DNSは、広告、トラッカー(個人情報追跡)やその他のDNSリクエストをブロックしません。
sdns://AQMAAAAAAAAAEjk0LjE0MC4xNC4xNDA6NTQ0MyC16ETWuDo-PhJo62gfvqcN48X6aNvWiBQdvy7AZrLa-iUyLmRuc2NyeXB0LnVuZmlsdGVyZWQubnMxLmFkZ3VhcmQuY29t
ファミリー保護サーバー
AdGuard DNSは、広告、トラッカー、アダルトコンテンツをブロックし、できる限りセーフサーチとセーフモードを有効にします。
sdns://AQMAAAAAAAAAETk0LjE0MC4xNC4xNTo1NDQzILgxXdexS27jIKRw3C7Wsao5jMnlhvhdRUXWuMm1AFq6ITIuZG5zY3J5cHQuZmFtaWx5Lm5zMS5hZGd1YXJkLmNvbQ
Plain DNS (通常のDNS)
デフォルトサーバー
AdGuard DNSは、広告とトラッカー(個人情報追跡)をブロックします。
IPv4:
94.140.14.14
94.140.15.15
IPv6:
2a10:50c0::ad1:ff
2a10:50c0::ad2:ff
フィルタリングなしサーバー
AdGuard DNSは、広告、トラッカー(個人情報追跡)やその他のDNSリクエストをブロックしません。
IPv4:
94.140.14.140
94.140.14.141
IPv6:
2a10:50c0::1:ff
2a10:50c0::2:ff
ファミリー保護サーバー
AdGuard DNSは、広告、トラッカー、アダルトコンテンツをブロックし、できる限りセーフサーチとセーフモードを有効にします。
IPv4:
94.140.14.15
94.140.15.16
IPv6:
2a10:50c0::bad1:ff
2a10:50c0::bad2:ff
プライベート AdGuard DNS を使ってみよう
信頼できるパブリックDNSは素晴らしいものですが、それをコントロール・カスタマイズすることはほとんどできませんし、何がどこでブロックされているのかという情報を確認することもできません。プライベートDNSなら、あなた独自のネットワークレベルファイアウォールとして機能し、ご自身に合わせて微調整でき、接続されているデバイスすべての完全なコントロールを可能にします。
コピー済み